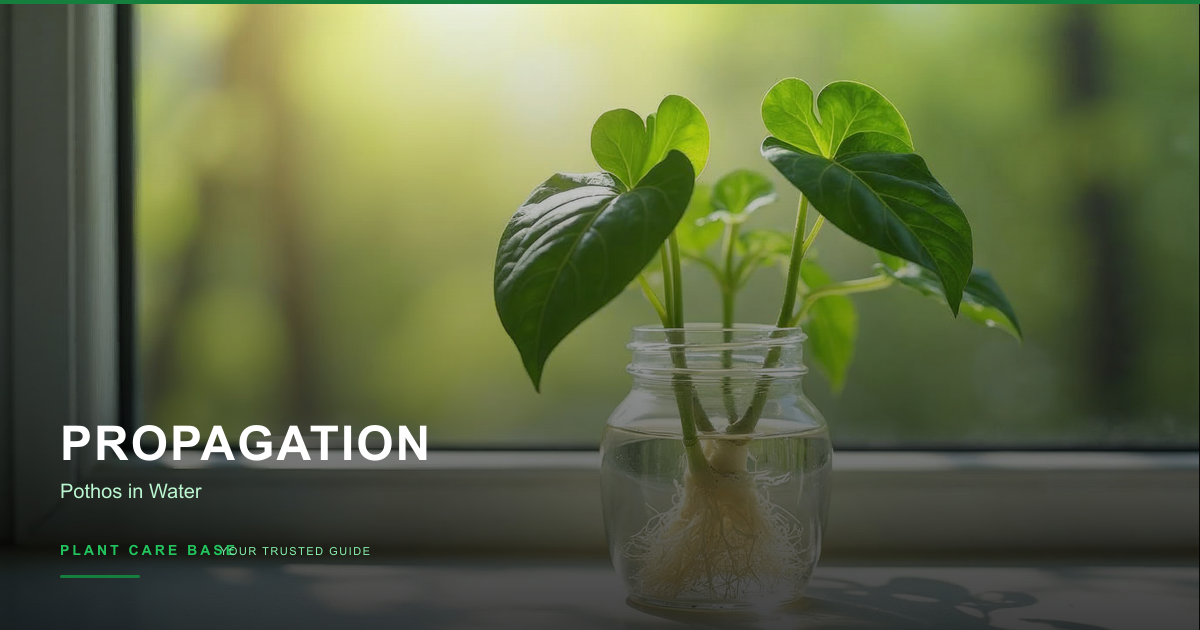
How to Propagate Pothos in Water: Step-by-Step with Pictures
Learn how to propagate pothos in water with this simple step-by-step guide. From cutting to rooting to potting, get free plants from your existing pothos.
I’m going to say something bold: propagating pothos in water is the single easiest thing you can do as a plant owner. Easier than repotting. Easier than mixing fertilizer. You cut a piece off your plant, stick it in water, and wait. That’s pretty much it. I’ve done this dozens of times, and I can honestly say I’ve never had a cutting fail on me.
If you’ve been wanting to multiply your pothos collection (or share cuttings with friends) but weren’t sure where to start, this guide walks you through every step. No guesswork, no fancy equipment.
Why Pothos Is the Easiest Plant to Propagate
Pothos (Epipremnum aureum) has earned its reputation as the best beginner houseplant for a lot of reasons, but the propagation factor might be my favorite. This plant wants to grow. Every single node along the vine is ready to push out roots the moment it touches water.
Most cuttings start showing roots within 7 to 14 days. Some of mine have sprouted tiny white nubs in as few as 4 days during the summer. Compare that to something like a fiddle leaf fig, which can take months and still fail on you. Pothos is almost impossible to mess up.
Whether you have a Golden Pothos, Marble Queen, Neon, or any other variety, the process is exactly the same. And once you get comfortable with it, you can use the same technique on most trailing houseplants, including spider plants.
What You’ll Need
The supply list is short, and you probably have everything already:
- Sharp scissors or pruning shears. Clean cuts heal faster and reduce the chance of infection. Wipe the blades with rubbing alcohol before you start.
- A clean glass or jar. Clear is best so you can see the roots develop. A mason jar, drinking glass, or even an old sauce jar works perfectly.
- Room-temperature water. Tap water is fine for most people. If your tap water is heavily chlorinated, let it sit out for 24 hours before using it.
- A healthy mother plant. Pick a vine that’s growing well with no signs of disease or pests. If your pothos is looking a bit rough, check our pothos drooping guide first and get it healthy before taking cuttings.
That’s it. No rooting hormone needed (though you can use it if you want). No heat mats. No special containers.
Step 1: Find the Node
This is the most important step, and it’s where most beginners trip up. Every successful cutting needs at least one node, which is the small, slightly raised bump on the stem where a leaf attaches to the vine.
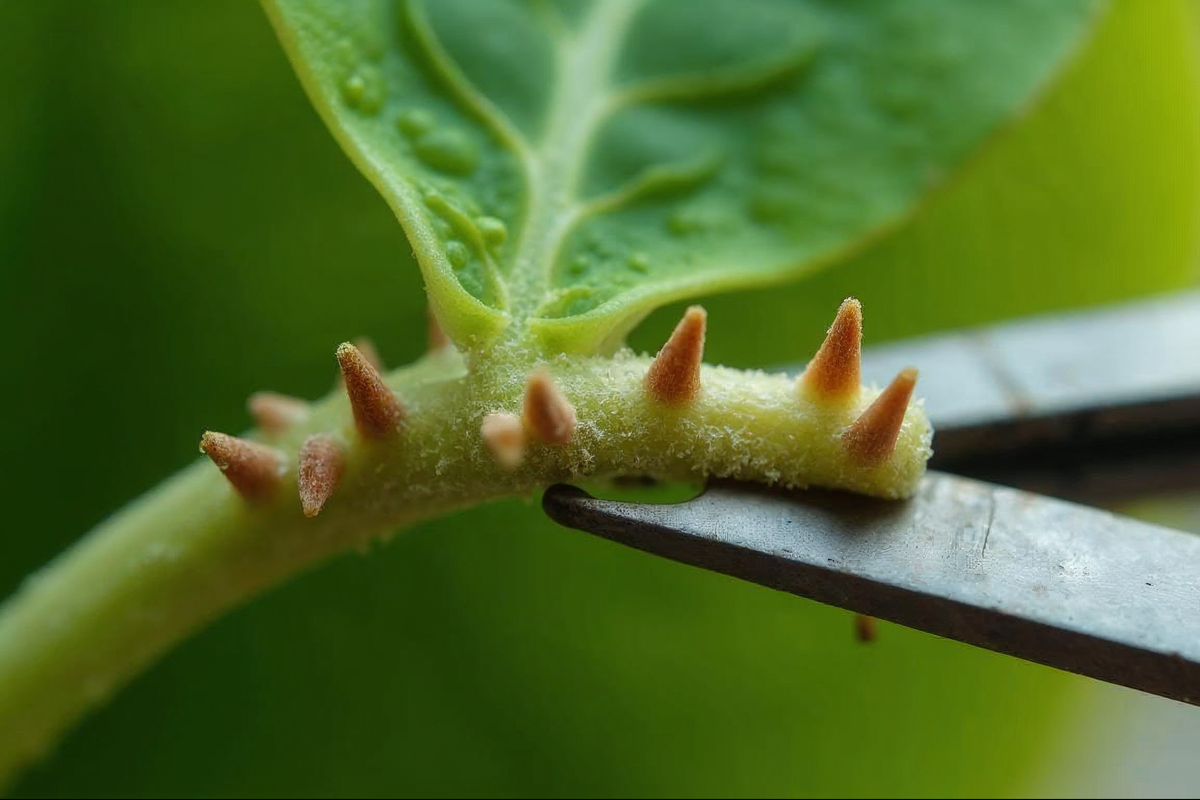
Look closely at any pothos vine. You’ll see that leaves grow at regular intervals along the stem. At each leaf junction, right where the leaf stalk (petiole) meets the main vine, there’s a small brownish bump or nub. Sometimes you’ll even see tiny aerial roots already forming there, which look like short brown or white stubs poking out from the stem.
That bump is the node, and it’s where your new roots will grow from. A cutting without a node will never produce roots. It might survive in water for a few weeks, looking green and healthy, but it won’t grow. So take a moment to identify your nodes before you pick up the scissors.
Run your finger along the vine. You can feel the slight bump at each leaf junction. Once you’ve found a good node on a section of vine with healthy leaves, you’re ready to cut.
Step 2: Make the Cut
Now that you’ve identified your node, here’s how to make the perfect cut:
- Count 2 to 3 leaves on the section you want to cut. Cuttings with multiple leaves root faster because they can photosynthesize more energy.
- Cut about 1/4 inch below the bottom node. You want a little bit of stem below the node to give it room to root.
- Remove the bottom leaf. The leaf closest to where you made the cut should be stripped off. If this leaf ends up underwater, it will rot and make the water cloudy and full of bacteria.
Your ideal cutting is about 4 to 6 inches long, with 2 to 3 leaves at the top and one or two exposed nodes at the bottom. If the vine is really long, you can take multiple cuttings from the same vine. Just make sure each piece has at least one node and one leaf.
Don’t worry about your mother plant. Pothos handle pruning extremely well. In fact, cutting the vines encourages the plant to branch out and grow fuller. You can learn more about keeping your mother plant thriving in our complete pothos care guide.
Step 3: Place in Water
Fill your glass or jar with room-temperature water and place the cutting inside. There are two things to get right here:
- The node must be fully submerged. This is where the roots will emerge, and it needs to stay in contact with water at all times.
- The leaves must stay above the waterline. Submerged leaves will rot within days, fouling the water and potentially killing the cutting.
If your cutting keeps floating up or tipping over, you can use a small piece of tape across the top of the glass to hold the stem in place. Some people also use propagation stations with built-in openings, but a regular glass works just as well.
Where to put it: Place the glass in a spot with bright, indirect light. Near a window that gets filtered light is perfect. Avoid direct sun hitting the glass. The water can heat up quickly in sunlight, and the cutting doesn’t need intense light during this stage.
A kitchen windowsill with a sheer curtain, a bathroom shelf near a window, or a desk a few feet from a bright window are all great spots.
Step 4: Wait and Watch
This is the fun part, where you get to watch roots appear seemingly out of nowhere.
Change the water every 3 to 5 days. This is a step people often skip, and it makes a real difference. Fresh water has dissolved oxygen that the developing roots need. Stale water becomes a breeding ground for bacteria, which shows up as a slimy film on the stem or a cloudy, greenish tint to the water. If you see either of those, change the water right away.
Here’s what to expect on the timeline:
- Days 1 to 3: Not much visible change. The cutting is sealing the wound and preparing internally.
- Days 4 to 7: You might notice small white bumps forming at the node. These are the very beginnings of roots.
- Days 7 to 14: Roots become clearly visible, growing longer each day. They’ll be white and slightly translucent.
- Days 14 to 21: Roots should be branching out and growing thicker.
Don’t rush to plant your cutting. I know it’s tempting once you see roots, but patience pays off here. Wait until the roots are at least 2 to 3 inches long before moving the cutting to soil. Short roots are fragile and may not survive the transition. Longer roots give the cutting a much better chance of establishing itself in soil quickly.
Step 5: Plant in Soil
Once your roots have reached 2 to 3 inches, it’s time to pot up your new plant.
- Choose a small pot with drainage holes. A 3 to 4 inch pot is ideal. Don’t go too big, because excess soil holds moisture that the small root system can’t absorb, which leads to rot.
- Fill with moist potting mix. A standard indoor potting mix with some perlite mixed in works great. Moisten the mix before planting so it’s damp but not soaking wet.
- Make a hole in the center of the soil with your finger and gently place the rooted cutting in. Be careful with the roots since water-grown roots are more delicate than soil-grown ones.
- Firm the soil gently around the base of the cutting and water lightly.
The transition period is real. Your cutting has been living in water, and the roots it grew are adapted to an aquatic environment. Switching to soil is a bit of an adjustment. For the first 2 weeks, keep the soil consistently moist (not soggy). This helps the roots adapt without drying out.
After those initial 2 weeks, you can start transitioning to a normal watering schedule: let the top inch of soil dry out between waterings. If you’re unsure about getting the moisture balance right, our overwatering vs underwatering guide breaks down exactly how to read the signs.
Common Mistakes to Avoid
I see these come up over and over again, and they’re all easy to avoid once you know about them.
Cutting without a node. This is the number one reason propagation fails. If your cutting is just a leaf on a stalk with no node, it will not root. Go back and look at the stem. Find that bump. Cut below it.
Forgetting to change the water. Old water gets stagnant, loses oxygen, and develops bacteria. That slimy coating on the stem? That’s bacterial biofilm, and it can block the node from producing roots. Set a reminder on your phone if you need to: every 3 to 5 days, dump and refill.
Planting too early. A cutting with half-inch roots might look ready, but those tiny roots often can’t handle the switch to soil. Wait for 2 to 3 inches. The extra week of patience is worth it.
Too much direct sunlight on the cutting. Cuttings don’t have a root system to support intense light and heat. Bright, indirect light is all they need. Direct afternoon sun can stress the cutting, heat up the water, and slow down root growth or even cause the cutting to wilt.
FAQ: Can I Keep Pothos in Water Forever?
Yes, you absolutely can. Pothos is one of the few houseplants that grows happily in water indefinitely. I have a couple of cuttings in jars on my kitchen shelf that have been growing in water for over a year.
A few things to keep in mind if you go this route:
- Growth will be slower compared to a soil-planted pothos. The plant won’t get as large or as full.
- Add a drop of liquid fertilizer once a month. Water doesn’t contain the nutrients that soil does, so a diluted all-purpose liquid fertilizer keeps the plant fed.
- Change the water weekly to keep it fresh and oxygenated.
- Top off the water as it evaporates. Don’t let the roots dry out.
Water-grown pothos make beautiful, low-maintenance decorations. They look great in a clear glass on a desk or windowsill, and you never have to worry about soil, drainage, or repotting.
Quick Propagation Timeline
Here’s a simple reference for what to expect at each stage:
| Day | What’s Happening |
|---|---|
| Day 1 | Cut placed in water, wound sealing |
| Days 3-5 | Small white bumps may appear at node |
| Days 7-14 | Visible roots growing from node |
| Days 14-21 | Roots branching and thickening |
| Day 21+ | Roots reach 2-3 inches, ready to pot |
| Weeks 3-5 | Planted in soil, transition period |
| Week 6+ | Established plant, normal care begins |
The timing can vary based on the season, temperature, and light. Summer propagations tend to root faster because the plant is in active growth mode. Winter cuttings might take a bit longer, but they’ll still work.
There’s something genuinely satisfying about turning one pothos into five, ten, or twenty plants without spending a cent. Once you get the hang of it, you’ll start eyeing every long vine as a propagation opportunity. And honestly, that’s half the fun of being a plant person. Happy propagating.
Frequently Asked Questions
How long does it take for pothos cuttings to root in water?
Can I propagate pothos directly in soil instead of water?
Why is my pothos cutting not growing roots?
Don't miss our guides
Weekly plant care newsletter.